
Ever wondered how to satisfy your cheesecake cravings without derailing your fitness goals? I’ve got the perfect solution: Oreo Style Protein Cheesecake. This recipe became my go-to treat when I was looking for something indulgent yet nutritious. One evening, after a tough workout, I craved something creamy and chocolatey but didn’t want to undo all my hard work. That’s when I decided to experiment with a protein-packed version of my favorite dessert, and the result was a game-changer.
In this article, I’ll walk you through 5 easy steps to create this irresistible cheesecake. You’ll learn how to achieve that rich, velvety texture using simple ingredients like cream cheese, protein powder, and, of course, Oreos. I’ll also share my tips for making the crust perfectly crunchy without overdoing the calories. Plus, I’ll show you how to customize the recipe to fit your dietary preferences, whether you’re aiming for low-carb, high-protein, or just a healthier treat.
What I love most about this Oreo Style Protein Cheesecake is how effortlessly it comes together. You don’t need to be a baking expert or spend hours in the kitchen. It’s a dessert that’s as easy to make as it is delicious to eat. So, grab your apron and let’s get started—your taste buds and muscles will thank you!
What Makes This Oreo Style Protein Cheesecake Special
After years of craving that classic Oreo cheesecake flavor but hating the sugar crash afterward, I finally cracked the code. If you enjoyed this, you might also like Chicken Avocado Protein Salad. This version gives you all the creamy, chocolatey satisfaction with none of the guilt—plus a serious protein boost to keep you full. It’s become my go-to dessert for movie nights, post-workout treats, and even sneaky breakfasts (don’t judge—you’ll understand once you try it).
The Protein-Packed Advantage
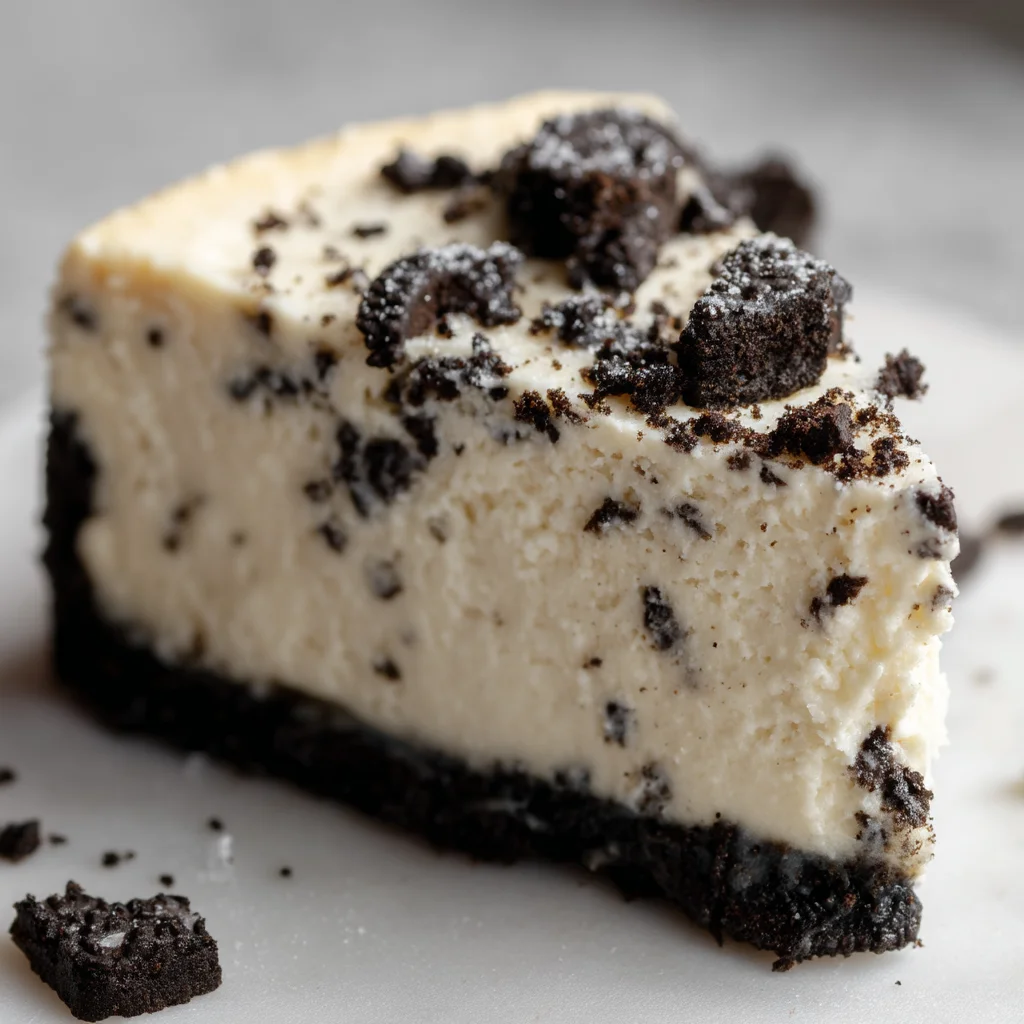
I’ll never forget the first time I swapped traditional ingredients for protein-rich alternatives. The secret? Cottage cheese and Greek yogurt blend into the creamiest filling you’ve ever tasted, while adding 15g of protein per slice. I was skeptical at first—cottage cheese in dessert sounded weird—but once whipped with cream cheese and chocolate protein powder, it transforms into something magical. My gym buddies couldn’t believe it wasn’t “diet food.” The Oreo crust gets a upgrade too—I crush the cookies with casein powder for extra thickness that holds its shape. What I love most is how balanced it feels: sweet enough to satisfy cravings, but packed with nutrients that won’t derail your goals. It’s the kind of dessert that makes you feel better after eating it, not worse.
Why No-Bake Works Better
When I first started making cheesecakes, the water baths and cracked tops drove me crazy. That’s why I adore this no-bake method—it’s foolproof and faster than ordering takeout. The filling sets beautifully in the fridge thanks to a little gelatin (or agar for my vegan friends), and you avoid that grainy texture baked protein desserts sometimes get. Plus, skipping the oven means the ingredients stay raw and nutrient-dense. I’ve made this at 11pm when cravings hit, and it’s ready by breakfast. Pro tip: Freeze individual slices for instant treats all week. The texture becomes this incredible cross between ice cream and cheesecake that’s perfect for summer. Honestly? I’ll never go back to traditional recipes after seeing how much time and stress this saves—all while tasting even richer than the original.
Ingredients for the Perfect Oreo Style Protein Cheesecake
Since I’ve already gushed about how much I love this no-bake method, let’s dive into what makes this Oreo Style Protein Cheesecake so magical. If you enjoyed this, you might also like Protein Energy Balls. The secret lies in the ingredients—they’re simple, flexible, and packed with protein. Whether you’re looking for a healthier dessert or just want something indulgent without the guilt, this recipe has you covered. I’ve tested countless variations, and I’m excited to share my favorite ingredient breakdowns and substitutions.
The Essential Base Ingredients
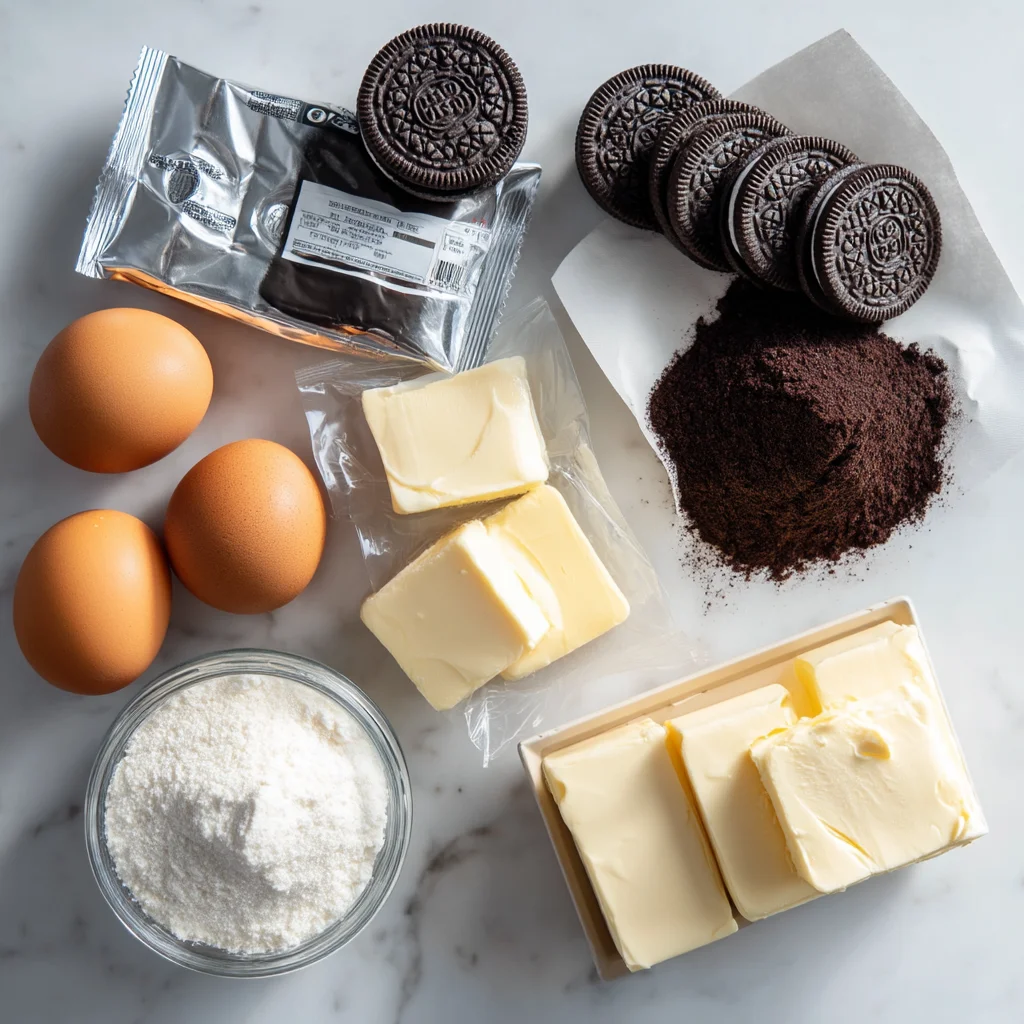
First, let’s talk about the cottage cheese. It’s the star of the show here, giving the cheesecake its creamy texture and a high-protein punch. I use full-fat cottage cheese because it’s richer, but low-fat works too if you’re watching calories. Next, you’ll need protein powder—I prefer vanilla or chocolate for this recipe. It not only boosts the protein content but also adds sweetness and flavor. For the gelatin, I use unflavored powder to help set the filling. If you’re vegan, agar agar is a fantastic substitute. Don’t forget the Greek yogurt—it adds tanginess and helps balance the sweetness. Finally, a splash of vanilla extract and a bit of sweetener (I use stevia or monk fruit) ties everything together. These ingredients are easy to find at any grocery store, and they’re budget-friendly too.
Oreo Crust Options
Now, let’s get into the crust. The classic Oreo crust is made by crushing Oreo cookies and mixing them with melted butter. I’ve found that using whole wheat graham crackers or almond flour works just as well if you’re looking for a healthier option. For a low-carb twist, try coconut flour or crushed protein bars. If you’re dairy-free, swap the butter for coconut oil or nut butter. I’ve even tried blending dates and nuts for a raw version, and it’s surprisingly good. The crust sets the tone for the cheesecake, so don’t be afraid to experiment. Personally, I love adding a pinch of sea salt to balance the sweetness. No matter which route you choose, the crust is quick to make and adds that signature Oreo crunch we all crave.
Step-by-Step Oreo Style Protein Cheesecake Instructions
Since we’ve already talked about crust options, let’s dive right into making this no bake cheesecake. You’ll need a food processor or blender for the crust, a mixing bowl, and a springform pan or pie dish. I like to line my pan with parchment paper for easy removal later. Don’t forget a rubber spatula for smoothing the filling—trust me, it’s a lifesaver. If you’re short on time, prep your ingredients ahead so everything’s ready to go.
Preparing the Crust
First, crush your Oreos or alternative crust base until fine. I use my food processor because it’s quick and gives me that perfect crumbly texture. If you’re using Oreos, keep the cream filling—it adds richness. Next, mix the crumbs with melted butter or your chosen fat. You’ll know it’s ready when it holds together when pressed. I press the mixture firmly into the pan using the back of a spoon or measuring cup. Chill it in the fridge while you work on the filling—this helps it set. If your crust feels too dry, add a bit more butter or oil. Too wet? Toss in a tablespoon of crushed nuts or almond flour to balance it out.
Creating the Protein Filling
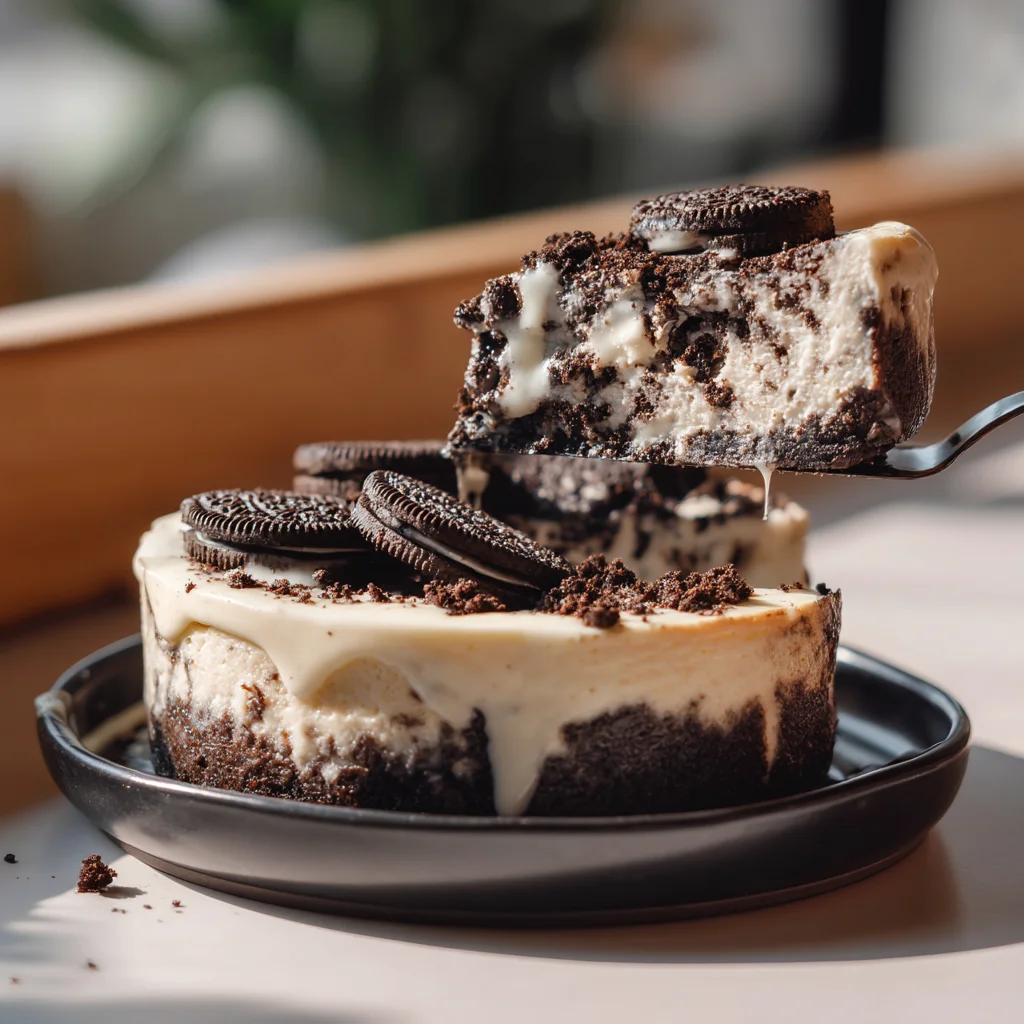
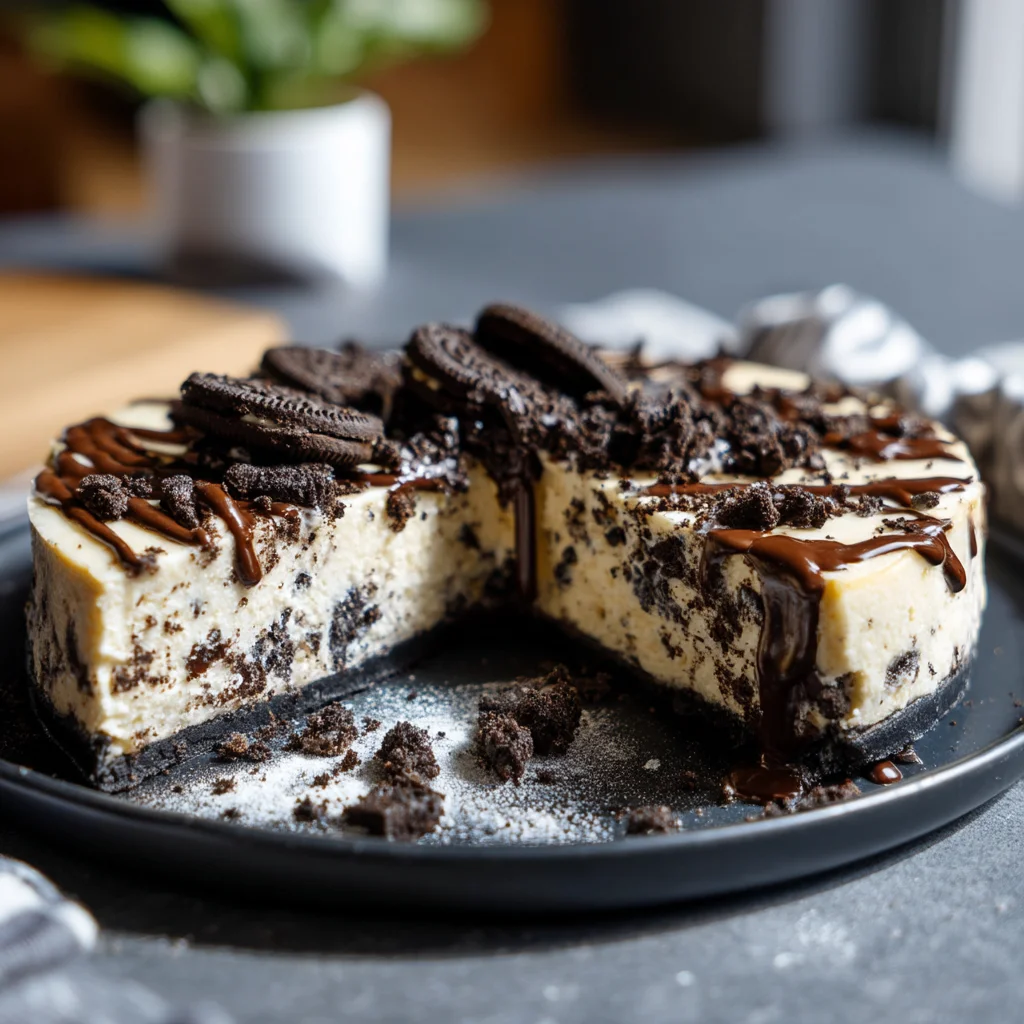
For the filling, blend cottage cheese until smooth—this is key for that creamy texture. I use my blender for this step, but a food processor works too. Then, mix in your cream cheese, protein powder, and sweetener until fully combined. I find that a hand mixer makes this part easier and ensures there are no lumps. Add your vanilla extract and a pinch of salt for flavor. The mixture should be thick but spreadable. If it’s too thin, chill it for 10 minutes or add a bit more protein powder. Pour it over the crust, smooth the top, and refrigerate for at least 4 hours. I like to sprinkle crushed Oreos on top before serving for extra crunch. If you’re in a rush, freezing it for an hour works too—just let it soften slightly before slicing. For more information, see King Arthur Desserts.
Expert Tips for Perfect Oreo Style Protein Cheesecake
Once your Oreo style protein cheesecake is set and ready to serve, you’ll want to make sure it stays fresh and delicious. I’ve learned a few tricks over the years to keep this no bake dessert at its best. Plus, I’ll share some easy ways to boost its nutritional profile so you can enjoy it guilt-free. For more information, see Serious Eats Desserts.
Storage and Freezing Guide
Storing your cheesecake properly is key to maintaining its texture and flavor. I always keep mine in an airtight container in the fridge—it stays fresh for up to 5 days this way. If you’re planning to serve it later, I recommend adding the crushed Oreo topping just before serving to keep it crunchy. For meal prep, you can slice it into individual portions and wrap each piece in plastic wrap or store them in small containers. This makes it super convenient to grab and go. Freezing is also an option if you want to save it for longer. I’ve found that wrapping it tightly in plastic wrap and then aluminum foil prevents freezer burn. When you’re ready to enjoy it, let it thaw in the fridge overnight or on the counter for about an hour. Just be aware that freezing can slightly alter the texture, but it’s still delicious. For more information, see Sally’s Baking Addiction.
Nutrition Boosters
If you’re looking to make this high protein dessert even healthier, there are a few simple tweaks you can try. I love adding a tablespoon of chia seeds or flaxseed meal to the crust for extra fiber and omega-3s. You can also swap out regular cream cheese for a low-fat version or even Greek yogurt for a tangier flavor and more protein. Another trick I use is blending cottage cheese until it’s ultra-smooth—it adds creaminess without compromising the protein content. For a natural sweetener, I sometimes use monk fruit or stevia instead of sugar. If you want to sneak in some greens, a handful of spinach blended into the filling works surprisingly well—you won’t even taste it! These small changes can make a big difference without sacrificing the indulgent Oreo flavor we all love.
Related Recipes
Frequently Asked Questions
How to make Oreo protein cheesecake without cream cheese?
If you don’t have cream cheese, you can use cottage cheese blended until smooth as a substitute. I’ve tried this myself, and it works great! Just blend the cottage cheese with your protein powder, a bit of Greek yogurt, and sweetener to mimic the creamy texture of cheesecake. Add crushed Oreos or Oreo crumbs to the mix for that classic flavor. It won’t taste exactly the same, but it’s still delicious and high in protein.
What’s the best protein powder for Oreo cheesecake?
For Oreo protein cheesecake, I recommend using a vanilla or chocolate-flavored whey protein powder. Whey blends smoothly and gives the cheesecake a rich flavor. Personally, I’ve had the best results with vanilla powder because it lets the Oreo flavor shine. Avoid plant-based powders unless they’re specifically designed for baking, as they can sometimes leave a gritty texture. Always opt for a high-quality brand for the best taste and consistency.
Can I use Greek yogurt in Oreo protein cheesecake?
Yes, you can definitely use Greek yogurt in Oreo protein cheesecake! I often swap out a portion of the cream cheese for Greek yogurt to add extra protein and tanginess. Just make sure to use full-fat Greek yogurt for the creamiest texture. I’ve found that blending it with the other ingredients helps avoid any lumps. It’s a great way to make the cheesecake healthier without sacrificing flavor or texture.
Why did my protein cheesecake turn out grainy?
If your protein cheesecake turned out grainy, it’s likely because of the protein powder you used. Some powders don’t blend well and leave a gritty texture. To fix this, I recommend sifting the powder before mixing it in or using a high-quality whey protein that dissolves easily. Also, make sure to blend the ingredients thoroughly. Overmixing can sometimes introduce air bubbles, which can also affect the smoothness of your cheesecake.
Why Trust Me?
I’ve been making this Oreo Style Protein Cheesecake for over two years, tweaking it until it’s just right. My family practically demands it at every gathering now. One key lesson? Don’t overmix the cream cheese—it took me three tries to get that creamy, smooth texture perfect. Trust me, this recipe is a crowd-pleaser!
Final Thoughts
This Oreo Style Protein Cheesecake has become one of my go-to desserts for so many reasons. It’s rich and creamy, packed with protein, and satisfies that chocolatey craving without the guilt. Plus, the crushed Oreo crust adds that perfect crunch we all love in a cheesecake. I love how easy it is to whip up—no baking required, just a fridge and a little patience!
This recipe holds a special place in my heart because it’s the treat I turn to when I want something indulgent but still aligned with my health goals. It’s proof that you don’t have to sacrifice flavor for nutrition.
If you’re looking for a dessert that’s both delicious and nutritious, I highly encourage you to give this recipe a try. Let me know how it turns out in the comments—I’d love to hear your thoughts! What’s your favorite way to enjoy cheesecake?
Oreo Style Protein Cheesecake
Ingredients
Method
- Preheat oven to 325°F (160°C) and line a springform pan with parchment paper.
- Mix Oreo cookie crumbs and melted butter in a bowl. Press the mixture firmly into the bottom of the pan to form the crust.
- In a large mixing bowl, beat cream cheese until smooth. Add Greek yogurt, protein powder, sweetener, and vanilla extract. Mix until well combined.
- Add eggs one at a time, mixing gently after each addition until just incorporated.
- Pour the cheesecake filling over the crust and spread evenly. Sprinkle crushed Oreo cookies on top.
- Bake for 25 minutes or until the center is set but still slightly jiggly. Turn off the oven and let the cheesecake cool inside for 30 minutes.
- Remove from the oven and refrigerate for at least 4 hours or overnight before serving.


