
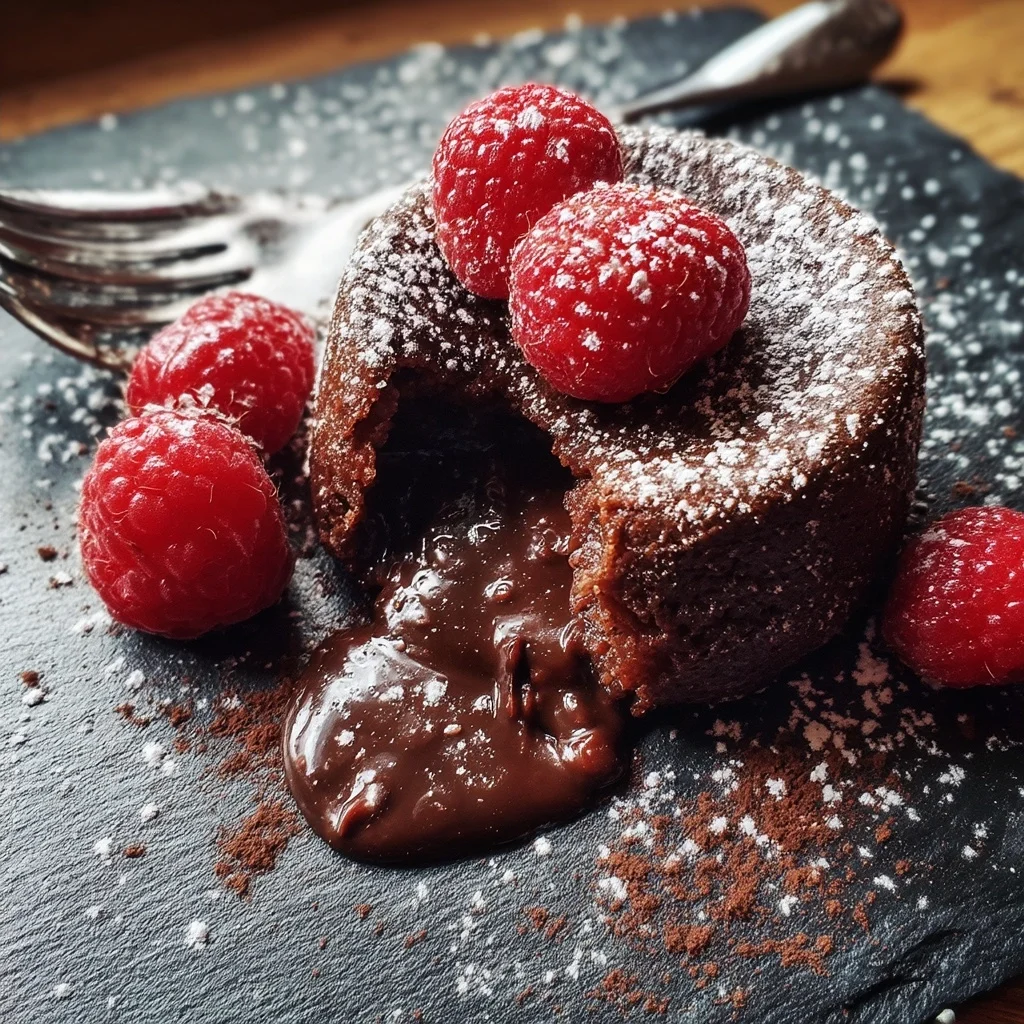
The moment you crack open a warm mini protein lava cake and that rich, molten center spills out is pure magic. I remember the first time I made these for my post-workout snack—my kitchen smelled like a decadent dessert café, but I knew each bite was packed with wholesome protein. Now they’re my go-to when I want something indulgent and nourishing.
In this guide, I’ll show you how to make mini protein lava cakes that are:
- Fluffy on the outside with a gooey center
- Naturally sweetened (no sugar crashes!)
- Ready in under 20 minutes
These mini cakes are perfect for portion control, but fair warning—you’ll probably want two. They’re that good. Whether you’re meal prepping for the week or impressing guests with a guilt-free dessert, this recipe is a game-changer. Let’s get baking!
What Are Mini Protein Lava Cakes?
That moment when your fork breaks through a warm cake and molten chocolate spills out? Pure magic. But here’s the twist—my mini protein lava cakes pack that same decadent experience with a nourishing boost. Picture this: fluffy chocolate exteriors hiding gooey centers, sweetened naturally, and delivering 10g of protein per serving. I started making these when I needed a post-workout treat that didn’t feel like “health food,” and now they’re my secret weapon for satisfying cravings guilt-free.

The Origin of Lava Cakes
I’ll never forget my first encounter with classic lava cakes at a tiny Parisian bistro—the way that rich center oozed onto my plate felt downright luxurious. Traditional versions rely on butter, sugar, and white flour, but my protein-packed spin came from necessity. One evening, I was craving that same molten texture but wanted something that wouldn’t leave me crashing an hour later. After testing dozens of batches (some tragic, some triumphant), I landed on a formula using vanilla protein powder and dark chocolate. The protein doesn’t just add nutrition—it gives the cakes structure so they hold their shape while baking, yet still release that signature lava flow when you dig in.
Why Choose Mini Protein Lava Cakes?
Let’s be real: most “healthy” desserts taste like cardboard with stevia sprinkles. What makes these mini cakes special is how they balance indulgence and nutrition. The protein comes from a blend of Greek yogurt and powder, which keeps them moist without dense protein-bar texture. I’ve baked them in everything from my air fryer to the microwave when I’m desperate—they’re incredibly forgiving. Plus, the mini size means portion control is built in (though I won’t judge if you eat two). They’ve become my go-to for everything from post-gym recovery to impressing friends who swear they “don’t like healthy desserts.” When my niece licked her plate clean last week and asked for seconds, I knew this recipe was a keeper.
Ingredients for Mini Protein Lava Cakes
What makes these protein lava cakes so irresistible is how simple the ingredient list is—there’s no need for complicated substitutions or hard-to-find items. Plus, the combination of vanilla protein powder and dark chocolate creates a rich, decadent flavor that feels indulgent while packing a nutritional punch. I’ve perfected this recipe over time, and I’m confident it’ll work for you too, whether you’re baking them in the oven, air fryer, or even microwaving them for a quick fix.

Essential Ingredients
At the heart of these mini cakes are just a few key ingredients that work together to create that perfect lava flow. Vanilla protein powder is non-negotiable—it gives the cake structure while keeping it tender. I prefer whey-based powders for their light texture, but plant-based options like pea protein work too. Next, dark chocolate (70% or higher) is essential for that molten center. I’ve found that using high-quality chocolate makes a huge difference—cheaper brands can leave the texture grainy.
You’ll also need Greek yogurt, which adds moisture and a subtle tang. I use full-fat yogurt for richness, but low-fat works in a pinch. Eggs bind everything together, and a touch of honey or maple syrup sweetens the batter naturally. Baking powder is the final touch—it helps the cakes rise just enough to hold their shape while staying gooey inside. If you’re dairy-free, you can swap the yogurt for coconut yogurt and use a dairy-free chocolate.
Optional Add-Ins
One of my favorite things about this recipe is how customizable it is. If you’re feeling adventurous, try mixing in a teaspoon of instant espresso powder for a mocha twist—it deepens the chocolate flavor beautifully. For a nutty crunch, fold in a handful of chopped almonds or walnuts. You can also experiment with different extracts—almond extract adds a lovely depth, while peppermint makes them perfect for the holidays.
If you’re baking these in the microwave or air fryer, I recommend adding an extra tablespoon of yogurt to keep them moist. And for a fun presentation, sprinkle the tops with powdered sugar or drizzle them with melted chocolate before serving. These little tweaks make each batch feel fresh and exciting, even if you’re making them weekly like I do.
Step-by-Step Guide to Making Mini Protein Lava Cakes
After playing around with different add-ins like espresso powder and nuts, you’re ready to bake these little chocolate miracles. I’ve tested both the microwave and air fryer methods dozens of times, and I’m thrilled to share the foolproof techniques I’ve perfected. The key is nailing that molten center while keeping the exterior tender—not dry.
Microwave Method
When I’m craving a single-serving treat in under 5 minutes, the microwave is my go-to. First, grease a small ramekin or microwave-safe mug really well—I use coconut oil spray because it never sticks. Whisk together 1 scoop chocolate protein powder, 1 tbsp cocoa powder, 1 tbsp Greek yogurt, 1 egg white (or 3 tbsp liquid egg whites), and ½ tsp baking powder until smooth. Microwave for 45 seconds, then check. It should look set around the edges but slightly jiggly in the center. If needed, add 10-second bursts. Let it sit for 1 minute—this helps the lava center form. Serve it straight from the mug or flip it onto a plate for a café-style presentation.
Air Fryer Method
For a slightly crispier edge with that same gooey middle, the air fryer works magic. Preheat to 320°F (160°C) while you prep the batter—same ingredients as the microwave version, but I add an extra tbsp of Greek yogurt since air fryers can dry things out. Divide the batter between two greased 4-oz ramekins, filling only halfway to leave room for rising. Air fry for 8-9 minutes until the tops spring back lightly when touched. Don’t overbake! The second you see cracks forming, they’re done. Let them cool for 2 minutes, then run a knife around the edges and invert onto plates. A dusting of powdered sugar or a dollop of whipped cream makes them feel extra special. For more information, see King Arthur Desserts.
Whichever method you choose, these protein lava cakes are best eaten warm, when that rich chocolate center oozes out at the first spoonful. Trust me, you’ll want to make a double batch—they disappear fast! For more information, see Serious Eats Desserts.
Expert Tips and Variations
That gooey chocolate center we all love in protein lava cakes can be tricky to nail, but after making dozens of batches (some more successful than others!), I’ve picked up a few secrets. Whether you’re using the microwave or air fryer method from earlier, these tips will help you avoid dry cakes or overcooked middles. For more information, see Sally’s Baking Addiction.

Pro Tips for Success
First, don’t skip greasing your ramekins or mugs—I use coconut oil spray because it’s flavorless and prevents sticking better than butter. Second, timing is everything: microwave versions cook in 60 seconds flat, but air fryer cakes need a watchful eye after the 7-minute mark. I’ve found that pulling them out when the tops look just set (with a slight jiggle in the center) guarantees that perfect lava flow. For extra insurance, I sometimes underfill the ramekins by a tablespoon—this keeps the batter from puffing up too much and drying out. And here’s my weirdest tip: if you’re using Greek yogurt, let the batter sit for 5 minutes before cooking. The yogurt thickens the mix, which helps create that molten core.
Creative Variations
Once you’ve mastered the basic recipe, try swirling in a spoonful of peanut butter or almond butter before baking—it melts into the center for a nutty surprise. For a protein lava cake microwave hack, I’ll sometimes replace half the cocoa powder with chocolate protein powder for an extra boost. Craving something fruity? Fold in 2-3 mashed raspberries or a drizzle of sugar-free caramel syrup into the batter. My favorite air fryer twist? Sprinkling the greased ramekins with crushed freeze-dried strawberries before adding the batter—they add a tart crunch that contrasts beautifully with the rich chocolate. Just remember: add-ins shouldn’t exceed 1-2 tablespoons, or they’ll throw off the baking time. Store any leftovers (unlikely, I know!) in the fridge for up to 2 days and reheat for 20 seconds in the microwave—they’ll taste nearly fresh.
Frequently Asked Questions
Can I make mini protein lava cakes without protein powder?
Absolutely! While protein powder gives these cakes their protein boost, you can easily make them without it. I’ve tested this by substituting the protein powder with an equal amount of almond flour or oat flour, which keeps the texture light. You’ll lose some of the protein content, but the cakes will still taste delicious. Another trick is to add a scoop of Greek yogurt or cottage cheese to the batter for extra protein without powder. Just note that the texture might be slightly denser, so I recommend baking them for 1-2 minutes less to keep them gooey in the center.
How do I store leftover mini protein lava cakes?
You can store leftovers in an airtight container in the fridge for up to 3 days. I like to wrap each cake individually in plastic wrap to keep them from drying out. When you’re ready to enjoy them, just pop one in the microwave for 15-20 seconds to bring back that molten center. If you want to freeze them, place them on a baking sheet to freeze solid first, then transfer to a freezer bag. They’ll last up to 2 months—reheat straight from frozen for about 30 seconds in the microwave for a quick treat.
Can I use an air fryer for mini protein lava cakes?
Yes, and they turn out great! I’ve made them in my air fryer by using silicone muffin molds to prevent sticking. Just preheat the air fryer to 325°F (160°C) and bake for 8-10 minutes, checking at the 8-minute mark. The key isn’t to overbake them, or you’ll lose the lava effect. If your air fryer runs hot, reduce the time by a minute or two. I love this method because it’s faster than the oven, and the cakes get a nice, slightly crispy edge while staying soft inside.
Why Trust Me?
I’ve been making these mini protein lava cakes for over two years, perfecting the recipe after countless Sunday brunch experiments. One time, I accidentally overbaked them and learned the exact 9-minute sweet spot for that gooey center. My sister, who’s a fitness coach, now swears by these as her go-to treat. Trust me, I’ve got this down to a science!
Wrapping It Up
These mini protein lava cakes are a game-changer for anyone craving something sweet yet healthy. I love how they’re packed with protein, making them guilt-free and perfect for post-workout treats or late-night snacks. Plus, they’re incredibly easy to make—just a few simple ingredients and less than 15 minutes in the oven.
This recipe holds a special place in my heart because it’s the one I turn to when I need a quick pick-me-up. There’s something magical about cutting into that warm, gooey center and savoring every bite.
I really hope you’ll give this recipe a try and see for yourself how delicious and satisfying these little cakes can be. Don’t forget to let me know how it goes in the comments—I’d love to hear your thoughts!
Now, I’m curious: what’s your go-to healthy dessert when you’re craving something sweet?
Mini Protein Lava Cakes
Ingredients
Method
- Preheat oven to 350°F and grease 6 cavities of a muffin tin.
- Whisk together protein powder, cocoa powder, almond flour, baking powder and salt in a large bowl.
- In another bowl, mix maple syrup, eggs, coconut oil and vanilla until smooth.
- Gradually add wet ingredients to dry ingredients, stirring until just combined.
- Fold in chocolate chips, then add almond milk to create a thick batter.
- Divide batter evenly among prepared muffin cups, filling each about 3/4 full.
- Bake for 10-12 minutes until edges are set but centers are still soft.
- Let cool for 2 minutes, then carefully remove from pan and serve warm.


