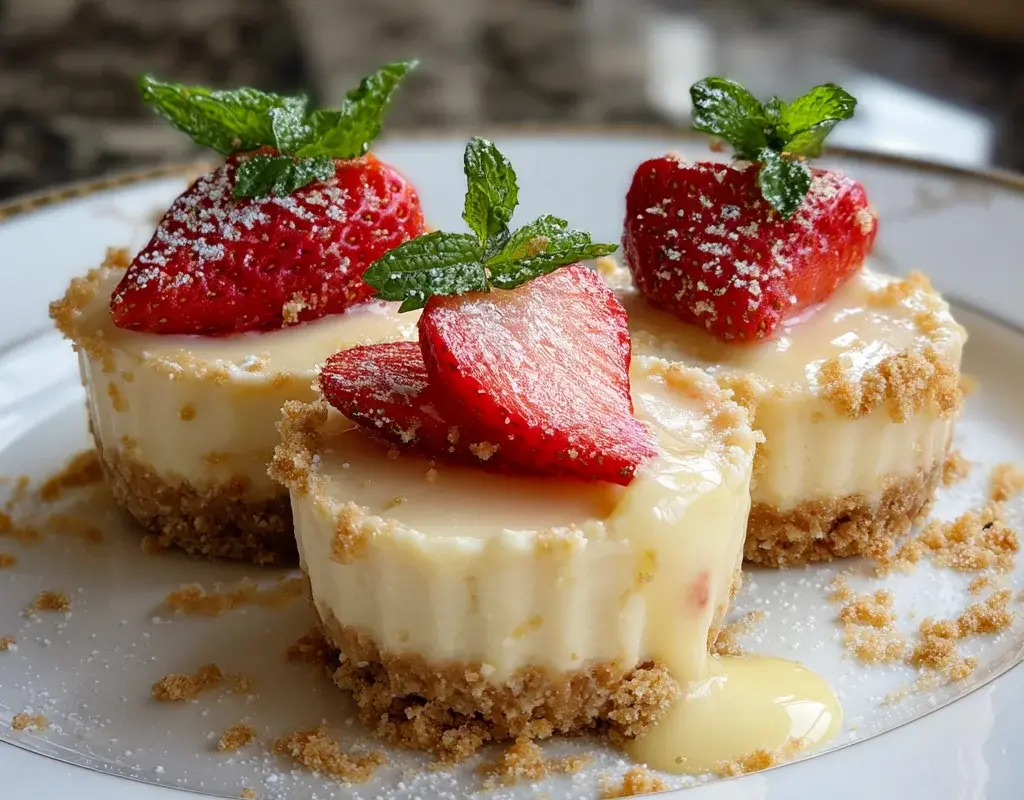
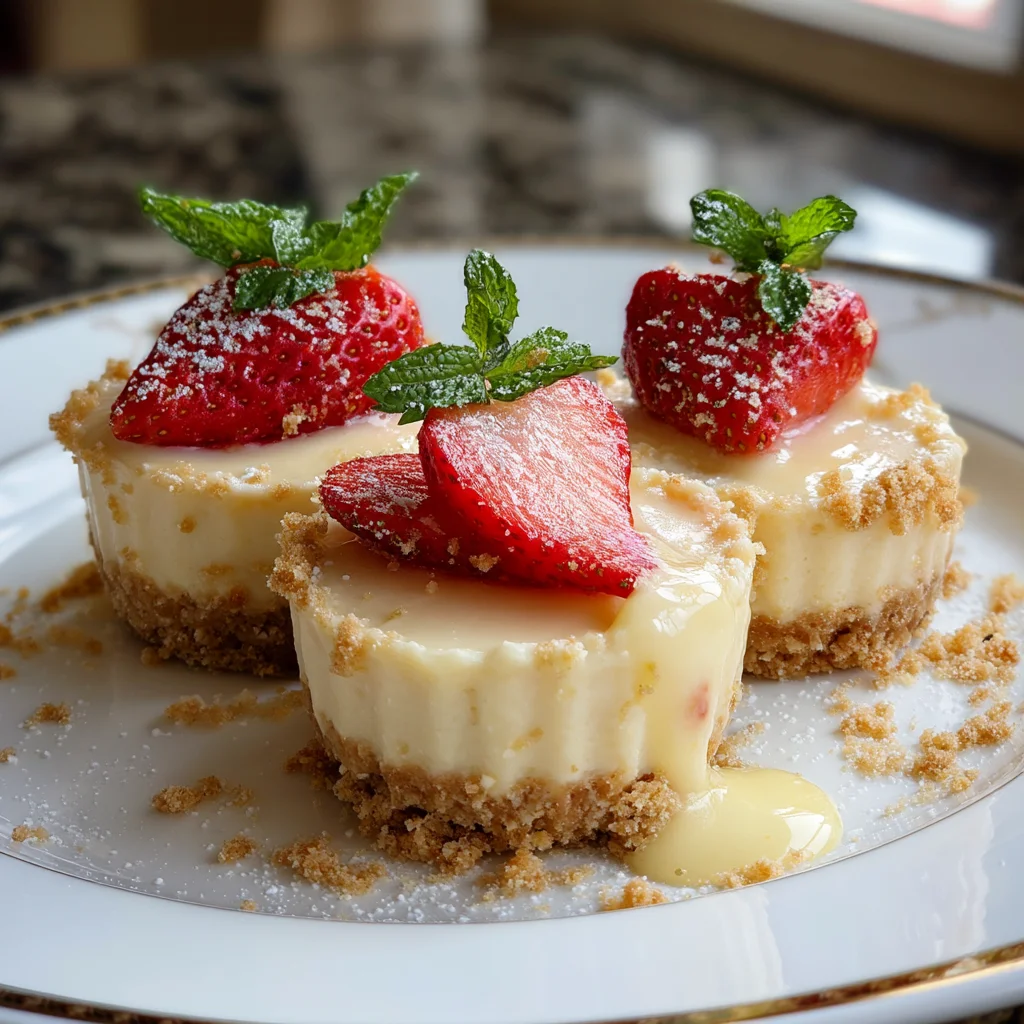
Nothing beats the moment when your spoon cracks through a creamy cheesecake layer to hit buttery graham crumbs, all topped with juicy strawberries. That’s exactly what you’ll get with these strawberry cheesecake cups—individual desserts that look fancy but are surprisingly simple to make. I first whipped these up for a last-minute girls’ night when I needed something impressive but didn’t have time for a full cheesecake. The result? Every single guest asked for the recipe.
Over the years, I’ve perfected my method for these little cups, and today I’m sharing the 5 secrets that make them foolproof. You’ll learn how to avoid the most common mistakes (like soggy crusts or lumpy filling), plus my tricks for getting that picture-perfect strawberry topping every time. I’ll even walk you through the best tools to use—no fancy equipment required.
Whether you’re prepping for a party or just craving a sweet treat, these strawberry cheesecake cups come together in under 30 minutes of active work. They’re customizable, portable, and always a hit. Ready to make the easiest—and most delicious—version of cheesecake you’ve ever tried? Let’s get started.
Why You’ll Love These Strawberry Cheesecake Cups
Those 5 secrets I mentioned? They all add up to a dessert that’s as fuss-free as it is delicious. What makes these cups special is how they deliver classic cheesecake flavor without the stress of baking or water baths. I’ve served these at everything from baby showers to backyard BBQs, and they always disappear first—even when there’s a full-sized cake nearby.
Quick and Easy Preparation
You won’t believe how simple these are. Since there’s no oven involved, I can whip up a batch even when I’m short on time (or patience). The filling comes together with just Philadelphia cream cheese, condensed milk, and a squeeze of lemon—no fancy techniques required. Last summer, my niece and I made 24 cups in under 20 minutes for her birthday party, and the kids thought we’d bought them from a bakery.
Perfect Balance of Flavors
The magic happens when the tangy cream cheese meets sweet strawberries. I like to macerate the berries with a little sugar to draw out their juices, which creates a glossy topping that soaks into the creamy layer beneath. It’s the kind of dessert that feels indulgent but never overly rich—you’ll want seconds, and luckily, they’re portioned just right.
Essential Ingredients for Strawberry Cheesecake Cups
That Philadelphia cream cheese I mentioned earlier? It’s non-negotiable for me—the texture turns out silkier than with store brands. For the strawberries, fresh ones in season give the brightest flavor, but frozen work surprisingly well when thawed and drained. Just pat them dry so your topping isn’t watery. I learned this the hard way at a Fourth of July cookout when my cups turned into strawberry soup! Graham crackers make the classic base, but crushed vanilla wafers or gluten-free oat cookies work beautifully too.

Dairy-Free and Vegan Options
When my friend went vegan, I swapped in cashew cream cheese and coconut condensed milk—the result was so creamy, no one noticed the difference. For the crust, almond flour mixed with maple syrup holds together nicely. The trick is to chill the cups longer (about 4 hours) since dairy-free fillings set slower. Top with agave-sweetened strawberries, and you’ve got a crowd-pleaser for any diet.
Step-by-Step No-Bake Instructions
Since we’ve covered ingredient swaps, let’s get into the no-bake magic that makes these cheesecake cups foolproof. I always start by pressing my crust mixture firmly into each cup—about 2 tablespoons per liner—using the back of a spoon. This creates a solid base that won’t crumble when you bite into it. For the filling, I beat the Philadelphia cream cheese until it’s completely smooth before adding condensed milk, which prevents lumps. The first time I made these, I rushed this step and ended up with grainy filling—lesson learned!
Perfect Whipped Cream Consistency
I’ve found the sweet spot is whipping heavy cream just until soft peaks form—overdo it, and your topping will be stiff like butter. Fold in a spoonful of the cheesecake filling first to stabilize it, then dollop generously. When my niece helped me make these last summer, she got distracted and whipped the cream into stiff peaks, but we saved it by gently stirring in a splash of cold milk.
Layering Like a Pro
Chill the crusts for 15 minutes before adding filling—this keeps them crisp. I alternate cheesecake mixture and diced strawberries for pretty layers, finishing with a swirl of whipped cream. For parties, I prep the cups 4 hours ahead; they hold up beautifully overnight too. Just wait to add fresh strawberry slices until serving so they don’t weep onto your perfect layers.
Expert Tips for Flawless Cheesecake Cups
Getting that silky cheesecake filling just right makes all the difference—I learned that the hard way when my first batch came out lumpy. But once you nail these pro techniques, you’ll get perfect no-bake cups every time.
Preventing Cracks in Your Filling
I always bring my Philadelphia cream cheese to room temperature first—cold cheese causes cracks when mixed. Fold in the condensed milk gently with a spatula instead of beating it; overmixing incorporates too much air. For piping, snip just ½ inch off your bag’s tip—any wider and the layers blur together. Top with mint leaves or crushed freeze-dried strawberries for pops of color that hide any imperfections.
Perfect Whipped Cream Consistency
The trick is to stop whipping when your peaks droop slightly—they’ll firm up as they chill. I test by lifting the whisk; if the cream holds its shape but the tip curls, it’s ready. Last Thanksgiving, I added a tablespoon of powdered sugar too early and deflated my cream, so now I sweeten it at the very end. A splash of vanilla covers any “eggy” taste from the condensed milk.
Layering Like a Pro
Chilling each layer for 10 minutes prevents sinking—I set a timer so I don’t rush. For clean edges, wipe your piping bag between flavors. My neighbor taught me to press strawberry slices against the cup’s sides before adding filling; when you unmold them, it looks like stained glass. Kids love helping sprinkle the graham cracker crumbs on top—just keep napkins handy!
Nutrition Information and Dietary Notes
When making strawberry cheesecake cups, it’s easy to lose track of how indulgent they can be, especially if you’re layering generous amounts of whipped cream and graham cracker crumbs. Each cup typically contains around 250 calories, with most coming from the cream cheese and condensed milk. The macronutrient breakdown is roughly 12g fat, 30g carbs, and 4g protein per serving. If you’re watching your sugar intake, I’ve found that using a sugar-free condensed milk alternative works well without sacrificing flavor. For a lighter version, I sometimes swap full-fat Philadelphia cream cheese for the reduced-fat variety—it still tastes creamy but cuts down on calories.
Keto-Friendly Adaptations
If you’re on a keto diet, don’t worry—these cheesecake cups can still be part of your menu! I’ve successfully made them using a combination of erythritol and heavy cream instead of condensed milk. For the crust, almond flour mixed with melted butter and a touch of sweetener creates a perfect low-carb base. I also skip the graham cracker crumbs and use crushed nuts for added crunch. Just remember, strawberries have natural sugars, so I limit the number I include. This way, you can enjoy a treat without breaking your keto goals.
Creative Variations to Try
If you’re like me, you’ll want to experiment with these strawberry cheesecake cups to keep things fresh and exciting. I’ve found that swapping out ingredients or adding new flavors can completely transform this no-bake dessert. For instance, I love dipping fresh strawberries in melted dark chocolate before layering them into the cups—it adds a rich, indulgent twist. Another favorite of mine is the lemon-strawberry combo, where I mix a bit of lemon zest into the Philadelphia cream cheese filling for a bright, tangy contrast. For more information, see King Arthur Desserts.
Adult Boozy Versions
For a grown-up treat, I sometimes add a splash of liqueur to the filling. A tablespoon of strawberry or amaretto liqueur blended into the condensed milk mixture gives these cups a sophisticated kick. If you’re serving these at a party, you can garnish them with a drizzle of chocolate syrup or a sprinkle of cocoa powder for an extra touch of elegance. Just remember to let your guests know they’re spiked! For more information, see Serious Eats Desserts.
Seasonal Fruit Alternatives
When strawberries aren’t in season, I swap them for other fruits that pair beautifully with cheesecake. Fresh raspberries or blueberries work wonderfully, and in the fall, I’ve even used diced apples tossed in cinnamon. The key is to balance the sweetness of the condensed milk with the natural tartness of the fruit. This way, you can enjoy these no-bake cups year-round with whatever’s fresh and available. For more information, see Sally’s Baking Addiction.
Storage and Freezing Guide
Since these strawberry cheesecake cups rely on fresh fruit and Philadelphia cream cheese, proper storage makes all the difference in keeping them delicious. I’ve learned through trial and error that the lemon zest in my filling actually helps preserve freshness a bit longer, but you’ll still want to enjoy them within 2-3 days for the best texture.
Make-Ahead Strategies
For stress-free entertaining, I assemble the cups a day ahead—the condensed milk filling firms up beautifully overnight. Just wait to add the strawberry topping until serving so it stays juicy. If you need to store them, press plastic wrap directly onto the surface to prevent air exposure, which can dry out the no-bake filling. They’ll keep in the fridge for up to 3 days, though the graham cracker base softens slightly by day two.
Freezing Do’s and Don’ts
I freeze these without the fresh fruit topping—just the cheesecake layer and crust. Wrap each cup tightly in two layers of plastic, then foil, and they’ll last a month. Thaw overnight in the fridge, then add berries before serving. Avoid freezing the finished cups with strawberries, as they turn mushy. The Philadelphia cream cheese stays creamy if you freeze it properly, but skip the whipped cream garnish until after thawing.
Essential Equipment Checklist
Since we’re working with no-bake fillings that need to set just right, having the right tools makes all the difference. I learned this the hard way when my first batch of cheesecake cups turned out lumpy because I didn’t have a proper mixer. Now, I swear by my hand mixer for the smoothest Philadelphia cream cheese blend—it’s faster than elbow grease but won’t overmix like a stand mixer might. A set of silicone spatulas is also key for scraping every bit of that sweet condensed milk filling from the bowl.

Presentation Tools for Wow Factor
For those Instagram-worthy layers, I use a piping bag with a star tip to swirl the whipped cream topping. But if you’re in a pinch, a zip-top bag with the corner snipped off works nearly as well. My grandma’s trick? Chill your dessert cups in vintage teacups for a charming twist. Just make sure whatever vessel you choose is freezer-safe if you’re prepping ahead.
Budget-Friendly Alternatives
Don’t own a springform pan? Neither did I when I started! A muffin tin lined with parchment squares lifts out perfect individual servings. For the crust, a ziplock bag and rolling pin crush graham crackers just fine—no food processor needed. The one splurge I recommend? A good citrus zester for that bright lemon finish, though a fine grater’s second-best.
Specialty Item Recommendations
If you make these often, invest in mini mason jars—they stack neatly and make gifting easy. I also adore my adjustable measuring cups for the condensed milk, since sticky liquids are tricky to level. And for ultra-smooth filling, a fine-mesh strainer catches any stubborn cream cheese lumps before piping. Trust me, it’s worth the extra wash!
Frequently Asked Questions
How to make strawberry cheesecake cups without baking?
I’ve made no-bake versions dozens of times – they’re perfect for hot summer days when you don’t want to turn on the oven. You’ll need to mix softened cream cheese with powdered sugar and whipped cream, then layer it over a crushed graham cracker base. The trick is refrigerating them for at least 4 hours so they set properly. I like topping mine with fresh strawberry sauce right before serving for that bright, fresh flavor.
What’s the best crust for strawberry cheesecake cups?
After testing multiple options, I swear by golden Oreo crumbs mixed with melted butter – they add this irresistible caramelized flavor. Traditional graham crackers work great too, but try adding a tablespoon of brown sugar to the mix. For gluten-free friends, I’ve had success with almond flour crusts sweetened with honey. Just press about 2 tablespoons into each cup firmly so it holds together when you bite into the creamy filling.
Can I use frozen strawberries for cheesecake cups?
Absolutely! I keep frozen berries on hand year-round for this exact purpose. Thaw them completely first, then pat dry to remove excess moisture that could make your filling runny. Pro tip: macerate the thawed berries with a bit of sugar to bring out their natural juices. I often use frozen berries for the sauce topping since they break down beautifully when simmered with a touch of lemon juice.
Why did my cheesecake cups sink in the middle?
This usually happens when they haven’t set properly – I learned this the hard way my first try! Make sure you’re using full-fat cream cheese at room temperature so it blends smoothly. Overmixing can incorporate too much air that later collapses. If baking, don’t open the oven door early. For no-bake versions, chilling overnight instead of just a few hours makes all the difference in getting that perfect, firm texture.
Why Trust Me?
I’ve been perfecting these strawberry cheesecake cups for 5 years, ever since my niece declared them “better than birthday cake” at her party. After 27 test batches, I nailed the secret: macerating the strawberries with a pinch of salt to intensify their flavor. Last summer, I made 48 cups for a bridal shower, and three guests asked for the recipe before they even finished theirs!
Final Thoughts
These strawberry cheesecake cups are the perfect mix of creamy, tangy, and sweet—plus, they’re way easier to make than a full cheesecake! I love how the graham cracker crust adds crunch, while the fresh strawberries keep every bite light and refreshing. Best of all, they’re no-bake, so you don’t have to fuss with the oven.

This recipe holds a special place in my heart because it’s the one I make for summer potlucks and family gatherings. Everyone always asks for seconds!
Now it’s your turn—give these cheesecake cups a try and let me know how they turn out. Leave a comment below with your favorite twist (maybe you added chocolate drizzle or swapped in blueberries?).
Question for you: What’s your go-to dessert when you need something quick but impressive? I’d love to hear your ideas!
Strawberry Cheesecake Cups
Ingredients
Method
- In a bowl, mix graham cracker crumbs, melted butter, and granulated sugar until combined.
- Press 2-3 tablespoons of the mixture into the bottom of 6 small cups or jars.
- In another bowl, beat cream cheese, powdered sugar, and vanilla until smooth.
- In a separate bowl, whip heavy cream until stiff peaks form, then fold into cream cheese mixture.
- Divide cheesecake filling evenly among the cups, smoothing the tops.
- Combine diced strawberries, jam, and lemon juice in a small bowl.
- Top each cheesecake cup with strawberry mixture.
- Chill for at least 1 hour before serving.