
The moment that rich, golden-brown aroma of slowly caramelized onions hits your nose, you know something incredible is coming. I’ll never forget the first time I made caramelized onion dip for a game day gathering—my friends demolished the bowl before halftime and demanded the recipe. That’s when I realized most store-bought versions don’t hold a candle to homemade, and with a few simple tricks, you can make one that’s truly unforgettable.
In this recipe, I’ll share the 5 secrets I’ve learned over years of testing—like why low-and-slow cooking is non-negotiable for onions, how to balance sweetness with tang, and the surprising ingredient that adds depth without overwhelming the flavor. You’ll also learn my trick for getting the perfect creamy texture (hint: it’s not just sour cream).
What makes this caramelized onion dip special isn’t just the technique—it’s the way the flavors deepen overnight, making it even better the next day. Whether you’re serving it with chips, veggies, or slathering it on a sandwich, this dip is a guaranteed crowd-pleaser. Ready to make the best version you’ve ever tasted? Let’s get started.
Why This Caramelized Onion Dip Works
That game day moment when my friends devoured the dip taught me something crucial: homemade caramelized onion dip isn’t just about tossing ingredients together—it’s about understanding the science behind each step. The magic happens when you treat every component with intention, from how you cook the onions to balancing the creamy base.

The Perfect Onion Caramelization Technique
I’ve ruined enough onions to know rushing this step is the biggest mistake. True caramelization relies on the Maillard reaction—that beautiful chemical process where sugars break down and develop deep, complex flavors. I slice my onions thin (never dice them—they’ll steam instead of caramelize) and cook them low and slow in butter or olive oil for at least 45 minutes. Stir them every 5-10 minutes, and when they start sticking, deglaze the pan with a splash of balsamic vinegar or white wine. That acidity cuts through the sweetness and adds brightness. Pro tip: If you’re short on time, a pinch of baking soda speeds up browning, but go easy—too much makes onions mushy.
Balancing Flavors and Textures
The onions are the star, but the supporting cast matters just as much. I use a mix of sour cream and Greek yogurt—the tanginess balances the onions’ richness, and the yogurt’s thickness prevents a runny dip. For umami depth, I add a dash of Worcestershire sauce (or soy sauce if I’m making it vegan). And don’t skip the garlic—I roast mine first to mellow its bite. What really makes this dip shine? Letting it sit overnight. The flavors meld, the onions soften further, and suddenly, it’s so good you’ll want to eat it with a spoon. Trader Joe’s fans might recognize this style—it’s that addictive, but with way more personality.
Essential Caramelized Onion Dip Ingredients
That overnight rest I mentioned? It’s magic, but only if you start with the right ingredients. Yellow onions are my go-to for caramelizing—they’ve got the perfect balance of sweetness and bite. Sweet onions (like Vidalias) work too, but they brown faster, so keep an eye on them. And if you’re feeling fancy, a mix of both adds complexity.

For the creamy base, I swear by a 50/50 blend of full-fat sour cream and Greek yogurt. The sour cream gives that classic dip richness, while the yogurt adds tang and keeps things from getting too heavy. If you’re out of sour cream, cream cheese thinned with a splash of milk makes a decadent substitute. And for my vegan friends, cashew cream (soaked blended cashews) or coconut yogurt mimic the texture beautifully—just add extra garlic or smoked paprika to compensate for the milder flavor.
Diabetic-Friendly Ingredient Swaps
I’ve made this dip for friends with dietary restrictions, and with a few tweaks, it’s just as craveable. Instead of regular sour cream, low-fat Greek yogurt cuts carbs without sacrificing creaminess. For a sugar-free caramelized onion hack, I use a splash of vegetable broth instead of wine or vinegar to deglaze—it still lifts the fond but keeps things neutral. And if you’re watching sodium, skip the Worcestershire and lean into herbs like fresh thyme or a pinch of smoked paprika for depth. One of my taste-testers actually prefers this version—she says the spices make the onions “pop” more.
Flavor Boosters You Shouldn’t Skip
Garlic is non-negotiable in my book, but roasting it first tames the sharpness and adds a nutty sweetness. If I’m short on time, I’ll sauté minced garlic in the onion pan during the last few minutes of cooking. A dash of fish sauce (sounds weird, I know) amps up the umami, but soy sauce works if you’re keeping it vegetarian. And if you love that Trader Joe’s-style addictiveness, a squeeze of lemon juice at the end brightens everything up. Pro tip: Taste as you go—sometimes all it needs is an extra pinch of salt to bring the flavors together.
Step-by-Step Caramelized Onion Dip Recipe
That squeeze of lemon juice I mentioned earlier? It’s the perfect bridge to talking technique, because timing matters just as much as ingredients here. I’ve made this dip two ways—baked until bubbly or chilled for a cool, creamy texture—and both have their merits. The no-bake version is my go-to for summer parties since it comes together fast, while the baked one feels cozier for fall gatherings.
Baked vs No-Bake Versions
For the no-bake dip, I let the caramelized onions cool completely before mixing them with sour cream, Greek yogurt, and seasonings. This keeps the texture light and prevents the dairy from breaking down. If you’re impatient (like me), spread the onions on a plate and pop them in the freezer for 10 minutes. The baked version is heartier—I fold in shredded Gruyère and bake at 375°F until golden. Pro tip: Use an oven-safe dish like a small cast iron skillet if you want those crispy edges everyone fights over.
Prep Timeline & Texture Tips
Caramelizing onions properly takes about 45 minutes, but I promise it’s worth it. I use a stainless steel pan (cast iron works too) because it lets me scrape up all the flavorful fond. For chunkier dip, I chop the onions roughly; for smoother texture, I pulse them in a food processor. Either way, let the finished dip chill for at least an hour—this mellows the raw garlic and lets the flavors marry. My Trader Joe’s-obsessed friend swears overnight refrigeration makes it taste “like the store-bought kind, but better.” Vegan? Swap in coconut yogurt and skip the cheese—it’s still dangerously snackable. For more information, see FDA Food Safety.
Pro Tips & Creative Variations
That baked version I mentioned earlier? It’s just the beginning. Over the years, I’ve tweaked this dip more times than I can count—sometimes by accident (like the time I dumped in crumbled bacon on a whim) and sometimes for crowd-pleasing potlucks. Here’s how to take your caramelized onion dip from good to “hide-the-bowl-from-your-guests” great. For more information, see USDA Food & Nutrition.
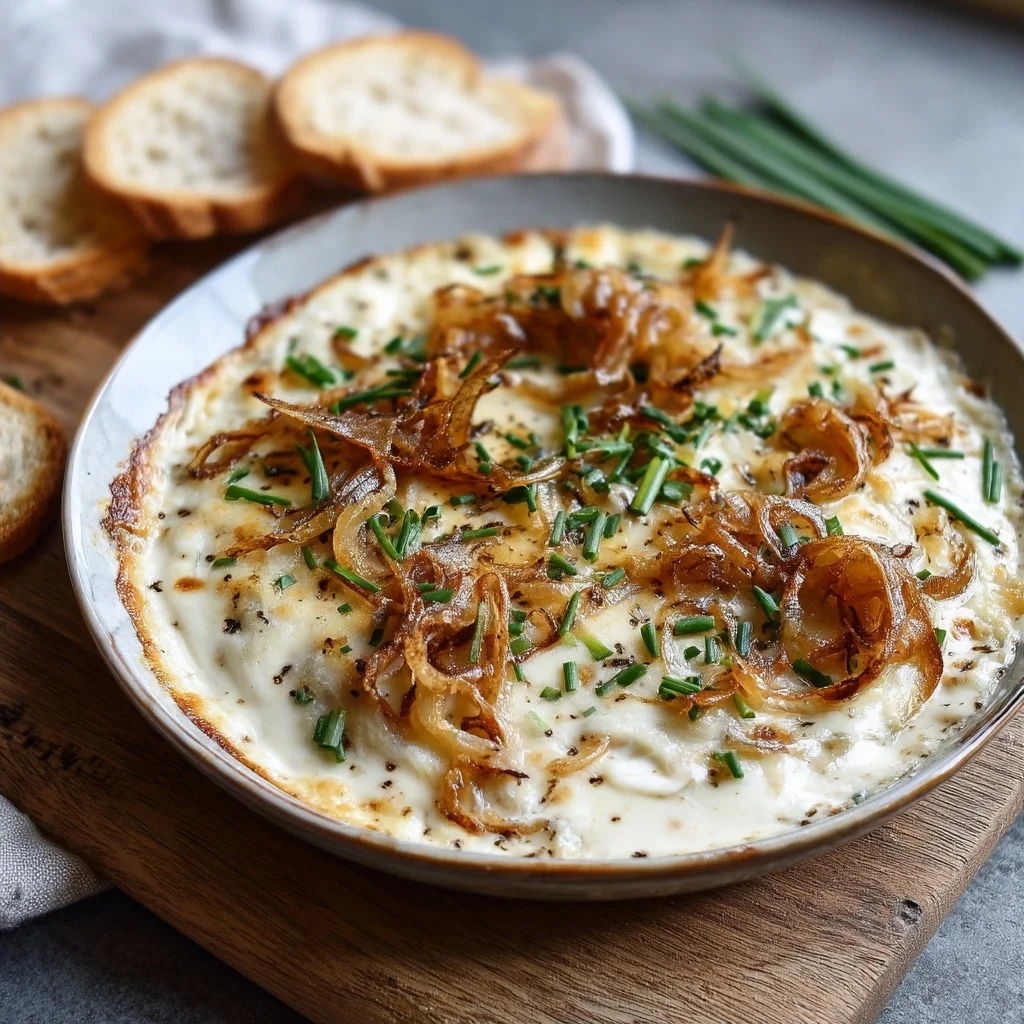
Restaurant-Style Presentation
I learned this trick from a chef friend: serve your dip in a shallow, wide bowl with a generous drizzle of olive oil and a sprinkle of smoked paprika on top. It instantly looks like something you’d pay $14 for at a gastropub. For parties, I prep individual ramekins—they bake evenly and prevent double-dipping drama. If you’re going the cold dip route, a dollop of Greek yogurt swirled in right before serving adds tangy brightness. And don’t underestimate the power of garnishes: thinly sliced chives or crispy fried shallots make it Instagram-worthy. My Trader Joe’s Everything But the Bagel seasoning? Life-changing sprinkled over the top. For more information, see Serious Eats.
Flavor Variations & Make-Ahead Hacks
Once you’ve mastered the base recipe, play with add-ins. I fold in crumbled blue cheese (about ¼ cup) for a funky twist, or roasted garlic paste if I want deeper savoriness. For meat lovers, crispy bacon bits are non-negotiable—just reserve some for garnish. Vegan friends adore my coconut yogurt version with nutritional yeast for cheesiness. The dip freezes surprisingly well (sans dairy if you’re planning long-term), though I prefer making it fresh and just caramelizing a big batch of onions ahead. They’ll keep refrigerated for 5 days, so you can whip up the dip in 10 minutes flat when guests arrive. Pro tip: Warm leftovers in a ramekin with extra cheese under the broiler for next-level baked potato topping.
Frequently Asked Questions
What are the ingredients in caramelized onion dip?
The base of my caramelized onion dip usually includes sour cream, mayo, and cream cheese for richness. Then I add deeply caramelized onions (cooked low and slow with butter or oil), garlic, Worcestershire sauce, salt, and a pinch of smoked paprika. Sometimes I toss in fresh chives or parsley for brightness. The key is letting the onions cook until they’re jammy and sweet—that’s what gives the dip its signature flavor.
What dip is good for diabetics?
If you’re watching sugar, try swapping the sour cream and mayo in caramelized onion dip for Greek yogurt or low-fat cottage cheese blended smooth. The onions still add natural sweetness without spiking blood sugar. I’d also skip the Worcestershire (it has sugar) and use lemon juice instead. Serve with veggie sticks or whole-grain crackers—it’s a great way to enjoy bold flavors without the carb overload.
Is French onion dip the same as caramelized onion dip?
Not quite! French onion dip is usually made with powdered soup mix stirred into sour cream, giving it a sharper, saltier taste. My caramelized onion dip uses real onions cooked until sweet and golden, which makes it richer and more complex. Both are creamy, but the homemade version has deeper flavor and none of the artificial aftertaste. Try them side by side—you’ll taste the difference immediately.
What do you use caramelized onion dip for?
I love this dip with crudités, pretzels, or potato chips for game day, but it’s also fantastic as a spread! Slather it on burgers, fold it into mashed potatoes, or dollop it over grilled steak. My favorite hack? Stir a spoonful into scrambled eggs or use it as a base for savory tarts. It’s so versatile—once you make it, you’ll find excuses to eat it with everything.
Why Trust Me?
I’ve been perfecting this caramelized onion dip for over a decade, making it at least twice a month for every game day and potluck. After burning one too many batches of onions, I discovered the magic of low-and-slow cooking with a splash of balsamic vinegar to deepen the flavor. My sister still begs me to bring “that dip” to every family gathering—it’s the first thing to disappear from the snack table.
Final Thoughts
This caramelized onion dip is one of my all-time favorite party staples because it’s rich, creamy, and packed with deep, sweet onion flavor. The key is taking your time to caramelize the onions—those golden strands make all the difference! Plus, the tangy blend of sour cream and cream cheese creates the perfect velvety base.

I’ve made this dip for years, and it’s always the first thing to disappear at gatherings. Whether you’re serving it with chips, veggies, or even slathering it on a sandwich, it’s guaranteed to be a hit.
Give it a try and let me know what you think in the comments—I’d love to hear how yours turns out! And tell me, what’s your go-to party snack? Maybe I’ll add it to my must-make list!
Caramelized Onion Dip
Ingredients
Method
- Heat butter and olive oil in a large skillet over medium-low heat. Add onions, salt, and pepper, stirring to coat.
- Cook onions for 20-25 minutes, stirring occasionally, until deeply golden and caramelized. Add brown sugar and balsamic vinegar in the last 5 minutes.
- Remove from heat and let onions cool slightly.
- In a mixing bowl, combine sour cream, cream cheese, mayonnaise, Worcestershire sauce, and garlic powder. Mix until smooth.
- Fold in caramelized onions, reserving 2 tbsp for garnish.
- Transfer dip to a serving bowl and top with reserved onions and fresh chives.
- Cover and refrigerate for at least 1 hour before serving to let flavors meld.
- Serve with potato chips, crackers, or fresh vegetables.


