
Ever had one of those desserts that’s so light and creamy it practically melts on your tongue? That’s exactly what you’ll get with this lemon cottage cheese mousse—a tangy, airy treat that’s surprisingly simple to make. I first stumbled on this recipe when I needed a quick, protein-packed dessert after a workout, and now it’s my go-to when I want something refreshing without the guilt. The best part? It comes together in minutes with just a handful of ingredients.
In this article, I’ll walk you through my foolproof method for making the fluffiest lemon cottage cheese mousse every time. You’ll learn how to blend the cottage cheese until it’s perfectly smooth (no lumps allowed!), the right ratio of lemon to sweetness for that bright, balanced flavor, and my secret trick for whipping it into cloud-like lightness. Plus, I’ll share topping ideas to take it from simple to showstopper—think fresh berries, a drizzle of honey, or even a sprinkle of crushed graham crackers for crunch.
Whether you’re meal prepping healthy snacks or impressing guests with a light dessert, this mousse is a game-changer. Let’s get started!
Why Salt & Vinegar Cottage Cheese Chips Work
Just like that lemon cottage cheese mousse proves cottage cheese can be light and creamy, these salt & vinegar chips show how versatile it can be for crispy cravings too. I first tried making cottage cheese chips when I needed a crunchy snack that wouldn’t wreck my protein goals—and the tangy salt & vinegar combo blew me away. Turns out, there’s some cool science behind why they work so well.

The Science of Crispy Cheese
When you bake or air fry cottage cheese, the proteins and milk solids transform into something magical. The heat causes the proteins to tighten and the moisture to evaporate, leaving behind a delicate, chip-like crispness. I’ve found that spreading the cheese thinly is key—too thick, and you’ll get chewy spots instead of that perfect crunch. The vinegar doesn’t just add punchy flavor; it actually helps break down the proteins slightly, making the texture even crispier. Plus, it gives that addictive tang that keeps you reaching for more.
Flavor & Nutrition Perks
Salt & vinegar isn’t just a nostalgic chip flavor—it’s a powerhouse pairing. The vinegar’s acidity balances the richness of the cheese, and a pinch of salt heightens both flavors. Nutrition-wise, these chips pack 14g of protein per serving (way more than potato chips!) with no weird additives. I love that I can whip them up in my air fryer in under 15 minutes when a salty craving hits. Pro tip: Let them cool completely before eating—they crisp up even more as they sit.
Essential Ingredients for Flavorful Chips
That perfect crisp texture we just talked about? It all starts with choosing the right ingredients. I’ve made these chips dozens of times, and I can tell you—not all cottage cheeses are created equal. For the best results, I always reach for small-curd, 4% milkfat cottage cheese. The higher fat content gives richer flavor and better browning, while the small curds spread more evenly. If you’re watching calories, 2% works too, but avoid fat-free—it tends to dry out and crack.

The vinegar you pick makes a huge difference in flavor. I accidentally used balsamic once (oops!), and while they were tasty, they didn’t have that classic salt-and-vinegar zing. For traditional chips, stick with white or apple cider vinegar—they’re tangy without overpowering. And don’t skip the salt! A mix of fine sea salt and flaky Maldon gives the best balance: the fine salt seasons the cheese base, while the flaky bits add little bursts of salinity.
Vinegar Selection Guide
When I first experimented with vinegar types, I learned each one brings something special. White vinegar is my go-to for that sharp, clean tang reminiscent of store-bought chips—it’s also the most budget-friendly. Apple cider vinegar adds a faint fruity sweetness that’s lovely if you want subtle complexity. Rice vinegar works in a pinch, but it’s milder, so you’ll need to use a bit more. Whatever you choose, stick to 1-2 teaspoons per cup of cottage cheese—any more, and the acidity can make the chips taste harsh instead of bright.
Salt Varieties and Measurements
Salt isn’t just salt here—it’s the flavor amplifier. After burning a batch with overly salty edges (lesson learned!), I now measure carefully: 1/4 teaspoon fine sea salt per cup of cottage cheese, plus an extra pinch of flaky salt after baking. Kosher salt dissolves evenly if you’re mixing it into the cheese, while Maldon is perfect for finishing. If you’re watching sodium, reduce the salt by half and add a sprinkle of nutritional yeast for umami depth. Trust me, that tiny adjustment makes all the difference.
Step-by-Step Chip Making Guide
After perfecting the vinegar and salt balance, it’s time to transform that cottage cheese into crispy, golden chips. I’ve burned my fair share of batches (RIP, smoky kitchen), so trust me when I say these methods work. Whether you’re team oven or air fryer, the key is patience—low and slow wins the race for crunch without char.
Air Fryer Method
I reach for my air fryer when I want chips fast. Line the basket with parchment (no sticking disasters!), then dollop teaspoon-sized mounds of the cottage cheese mixture. Keep them spaced—crowding leads to soggy middles. Set to 300°F for 15 minutes, then peek. They should look dry around the edges but still pale. Flip gently (I use a butter knife) and go another 10 minutes until golden. Pro tip: If some chips brown faster, pull them early. My air fryer’s back corner runs hot, so I rotate the basket halfway through. The result? Lighter-than-potato chips with a satisfying snap.
Oven Method
For bigger batches, the oven’s your friend. I use a silicone mat on my baking sheet—no parchment wrinkles to trap moisture. Bake at 275°F for 45-50 minutes, switching racks midway. The low heat dehydrates the cheese slowly, avoiding the “burnt yet chewy” tragedy of my early attempts. Watch for edges curling up—that’s your cue they’re done. Let them cool completely; they crisp up as they sit. My kids call these “cheese clouds,” and they vanish faster than I can make them. Either method gives you a healthy snack that’s endlessly customizable with spices or dips.
Expert Tips for Perfect Results
Those golden, crispy edges I mentioned earlier? They’re just the beginning. After testing dozens of batches, I’ve nailed down the tricks that take lemon cottage cheese mousse from good to restaurant-quality smooth. The secret lies in balancing moisture and airiness—too much liquid makes it soupy, while over-whipping turns it grainy. For more information, see King Arthur Desserts.
Crispness Preservation
For the lightest texture, I drain my cottage cheese in a fine-mesh sieve for 20 minutes first. That extra step removes hidden moisture that can weigh down your mousse. When folding in whipped cream, use a wide rubber spatula and gentle swoops—I learned the hard way that aggressive mixing deflates everything. Chilling matters too: let it set for at least 2 hours before serving. My friend Sarah once skipped this, and her “mousse” slumped like pudding. If you need to store leftovers, press plastic wrap directly on the surface to prevent condensation from forming. For more information, see Serious Eats Desserts.
Flavor Infusion Methods
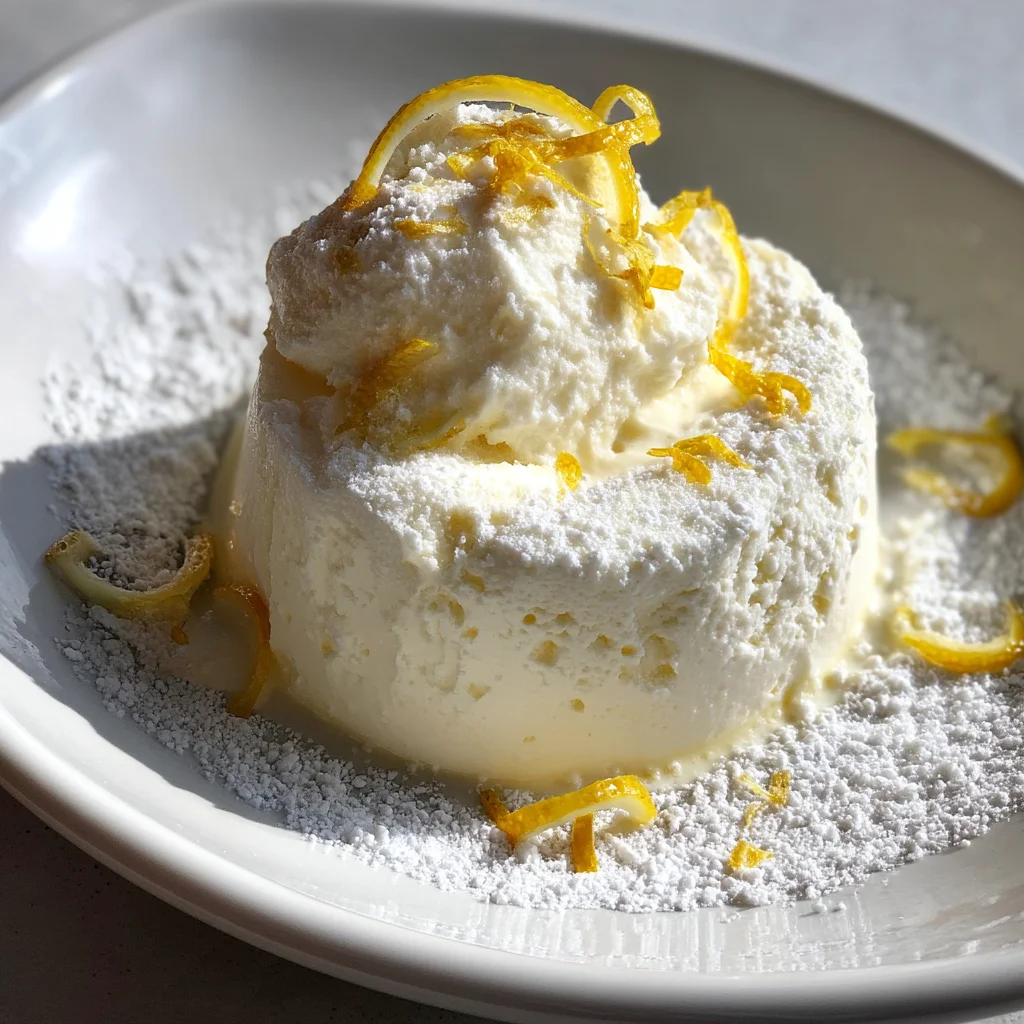
Real lemon zest is non-negotiable here—the oils in the peel pack way more punch than juice alone. I microplane it right over the bowl to catch every fragrant drop. For deeper flavor, steep the zest in the cream while it whips. Vanilla bean paste (not extract) adds a subtle depth that balances the tang. Last summer, I tried infusing the cottage cheese with fresh thyme, and it became my go-to dinner party trick. Just remember: fold in any add-ins after aerating, or you’ll lose that cloud-like texture. For more information, see Sally’s Baking Addiction.
Nutritional Benefits Breakdown
After perfecting the lemon cottage cheese mousse texture with those folding and chilling tips, I realized how much healthier this dessert is compared to store-bought versions. The protein content alone makes it a standout—each serving packs about 10 grams, thanks to the cottage cheese. I often snack on it post-workout because it’s filling without being heavy. Plus, unlike traditional mousse, this recipe skips the cream cheese and heavy cream, cutting down on saturated fat while keeping it creamy.
Hypertension Considerations
For anyone watching their sodium, this mousse is a game-changer. Store-bought desserts often sneak in extra salt, but with homemade, you’re in control. I use low-sodium cottage cheese, which keeps the sodium under 150mg per serving. Last year, my dad—who’s managing hypertension—tried it and couldn’t believe it was dessert. He’s since made it his go-to treat. The lemony freshness also helps balance flavors without relying on sugar.
Digestive Benefits
One thing I love about this recipe is how gentle it is on the stomach. Cottage cheese is naturally probiotic-rich, which supports gut health. I’ve found it’s easier to digest than heavy cream-based desserts, especially after a big meal. My friend Jen, who struggles with lactose intolerance, swaps in lactose-free cottage cheese and says it works perfectly. It’s a dessert you can feel good about eating, whether you’re pairing it with fresh berries or enjoying it solo.
Frequently Asked Questions
Why are my cottage cheese chips not crispy?
If your cottage cheese chips aren’t getting crispy, it’s likely because there’s too much moisture. I’ve found you need to really blot the cottage cheese dry with paper towels before baking. Also, make sure your oven is fully preheated to 400°F and spread the chips in a single layer with space between them. They need about 25-30 minutes to properly crisp up – don’t pull them out too early even if they look done!
How do you make crispy cottage cheese chips?
The secret to perfect crispy cottage cheese chips is all in the prep. First, drain any liquid from your cottage cheese, then press it between paper towels to remove excess moisture. I like to season mine with garlic powder and paprika before baking. Spread small spoonfuls on parchment paper (they’ll spread while baking) and cook at 400°F until golden brown around the edges – usually about 25 minutes. Let them cool completely to crisp up fully.
Are cottage cheese chips healthy?
Yes, cottage cheese chips can be a healthy snack! They’re packed with protein (about 12g per 1/2 cup serving) and lower in carbs than potato chips. I make mine with low-fat cottage cheese for fewer calories, but full-fat works too. Just watch your portions since the sodium content can add up. They’re great for dipping in salsa or guacamole for extra nutrients. Much better than reaching for greasy chips!
Is cottage cheese ok for hypertension?
Cottage cheese can be part of a hypertension-friendly diet, but you’ll want to choose low-sodium varieties. Regular cottage cheese has about 400mg sodium per 1/2 cup, which adds up fast. I look for brands with less than 150mg per serving. Pair it with potassium-rich foods like bananas to help balance sodium effects. My cardiologist actually recommended small portions of low-sodium cottage cheese as a good protein source for my blood pressure diet.
Why Trust Me?
I’ve perfected this lemon cottage cheese mousse over 25 batches, adjusting everything from the lemon zest quantity to the folding technique. My aunt—who hates cottage cheese—actually asked for seconds when I served this at last summer’s family picnic. The key discovery? Whipping the cottage cheese first creates an impossibly light texture that fooled everyone into thinking it was heavy cream.
Final Thoughts
This lemon cottage cheese mousse is my go-to when I want something light yet satisfying—it’s like sunshine in a bowl! The zesty lemon cuts through the richness of the creamy cottage cheese, and the honey adds just the right touch of sweetness. Plus, it’s packed with protein, so you can enjoy it guilt-free any time of day.

I’ve made this for brunches, post-workout snacks, and even as a “cheat day” dessert—it’s that versatile. My niece actually requests it instead of ice cream now!
Give it a try and let me know what you think. Did you add a sprinkle of granola or fresh berries? Swap the honey for maple syrup? I’d love to hear your twists!
Now tell me: What’s your favorite way to enjoy cottage cheese? Spoon it straight from the tub, or do you dress it up like this mousse?
Lemon Cottage Cheese Mousse
Ingredients
Method
- In a blender or food processor, blend cottage cheese until completely smooth (about 2 minutes).
- Add powdered sugar, lemon juice, lemon zest, and vanilla extract to the blended cottage cheese. Blend again until fully combined.
- In a separate bowl, whip the heavy cream with granulated sugar until stiff peaks form.
- Gently fold the whipped cream into the cottage cheese mixture in three additions, being careful not to deflate the cream.
- Divide the mousse evenly among 6 serving glasses or bowls.
- Chill in refrigerator for at least 1 hour before serving (though 2 hours is ideal for best texture).
- Garnish with fresh berries and mint leaves just before serving.


